The Complete Backend Development Module Revision Guide
Module 1: The Core Express Engine
We built a local server using Node.js and Express. We learned that the server listens on a specific network entry point called a Port.
Key Concept: Requests come from a client (like Postman), routes parse them, and the server sends a response.
The Code:
import express from 'express';
const app = express();

// A basic testing route
app.get('/test', (req, res) => {
    res.status(200).json({ message: "Server is alive!" });
});

app.listen(5000, () => {
    console.log("Server running on port 5000");
});
Module 2: Request Parsing & Middleware
We discovered that raw incoming requests are unreadable by Express by default. We introduced Middleware to intercept and translate incoming data payloads.
Key Concept:
app.use(express.json())acts as an incoming data translator. Without it,req.bodyreturns empty curly braces{}. If a client sends plain text instead of choosing theJSONdropdown header in Postman, the middleware ignores it.The Code:
// This MUST be initialized before your routes!
app.use(express.json());

app.post("/api/v1/echo", (req, res) => {
    const payload = req.body; // Securely parsed thanks to middleware
    res.status(200).json({ received: true, yourPayload: payload });
});
Module 3: Database Mechanics & Asynchronous Control
We connected our server to a remote cloud database (MongoDB Atlas) using Mongoose. We learned that network operations take unpredictable time, requiring asynchronous architecture.
Key Concept: * Schema: The blueprint structural rules for your data.
Model: The executable engine that actually talks to the database.
Async/Await: Tells JavaScript to wait for the database cloud to answer before moving to the next line.
Try/Catch: The safety net that handles unexpected network or database crashes safely.
Connection Strings: Standard strings (
mongodb://...) explicitly list individual server shards, completely bypassing pesky local router DNS glitches that occur with shortcutmongodb+srv://links!The Code:
// 1. Data Schema Blueprint
const userSchema = new mongoose.Schema({
    username: String,
    email: String,
    role: String
});

// 2. Database Action Model
const User = mongoose.model('User', userSchema);

// 3. CREATE Route (POST)
app.post("/api/v1/echo", async (req, res) => {
    try {
        const dataRecorded = await User.create(req.body);
        res.status(201).json({ success: true, user: dataRecorded });
    } catch (err) {
        res.status(500).json({ success: false, error: err.message });
    }
});

// 4. READ Route (GET)
app.get("/api/v1/echo", async (req, res) => {
    try {
        const allUsers = await User.find({}); // Empty object means "find all"
        res.status(200).json({ success: true, count: allUsers.length, users: allUsers });
    } catch (err) {
        res.status(500).json({ success: false, error: err.message });
    }
});

// 5. Connect to Cloud
mongoose.connect('YOUR_NON_SRV_MONGODB_CONNECTION_STRING_HERE')
    .then(() => console.log("Database Connected Successfully"))
    .catch((err) => console.log("Database Error: ", err));
Module 4: Dynamic Advanced Routing (PUT)
We upgraded our architecture to handle targeted entity operations using dynamic identifiers.
Key Concept: Express uses parameters (
/:id) to map dynamic variables straight out of the URL path layout viareq.params. We useUser.findByIdAndUpdatecombined with{ new: true }to execute modification logic and view changes instantly.The Code:
// UPDATE Route (PUT) Target URL example: http://localhost:5000/api/v1/echo/6a47843e...
app.put("/api/v1/echo/:id", async (req, res) => {
    try {
        const userId = req.params.id; // Extract variable from path
        const updatedUser = await User.findByIdAndUpdate(userId, req.body, { new: true });

        if (!updatedUser) {
            return res.status(404).json({ success: false, message: "User not found" });
        }

        res.status(200).json({ success: true, message: "Updated!", user: updatedUser });
    } catch (err) {
        res.status(500).json({ success: false, error: err.message });
    }
});
Module 5: Permanent Resource Deletion (DELETE)
We finished the final step of the CRUD cycle by building a route to permanently purge records from our database layer using dynamic routing.
Key Concept: Just like an update (
PUT), the deletion method requires specific execution targeting via dynamic URL parameters (req.params.id). We use Mongoose'sUser.findByIdAndDelete()method to target and drop the document, and we implement a check conditional statement (if (!deletedUser)) to make sure our system doesn't lose track of itself if a client submits an ID that doesn't exist anymore.The Complete Operational Code:
import express from 'express';
import mongoose from 'mongoose';

const app = express();

// 1. GLOBAL PARSING MIDDLEWARE
app.use(express.json());

// 2. MONGOOSE SCHEMA & MODEL DEFINITION
const userSchema = new mongoose.Schema({
    username: String,
    email: String,
    role: String
});

const User = mongoose.model('User', userSchema);

// 3. CREATE ROUTE (POST)
app.post("/api/v1/echo", async (req, res) => {
    try {
        const dataRecorded = await User.create(req.body);
        res.status(201).json({ success: true, user: dataRecorded });
    } catch (err) {
        res.status(500).json({ success: false, message: "Failed to save user data", error: err.message });
    }
});

// 4. READ ROUTE (GET)
app.get("/api/v1/echo", async (req, res) => {
    try {
        const allUsers = await User.find({});
        res.status(200).json({ success: true, count: allUsers.length, users: allUsers });
    } catch (err) {
        res.status(500).json({ success: false, message: "Failed to get user data", error: err.message });
    }
});

// 5. UPDATE ROUTE (PUT)
app.put("/api/v1/echo/:id", async (req, res) => {
    try {
        const userId = req.params.id;
        const updatedUser = await User.findByIdAndUpdate(userId, req.body, { new: true });

        if (!updatedUser) {
            return res.status(404).json({ success: false, message: "User not found" });
        }

        res.status(200).json({ success: true, message: "User updated successfully", user: updatedUser });
    } catch (err) {
        res.status(500).json({ success: false, message: "Failed to update user data", error: err.message });
    }
});

// 6. DELETION ROUTE (DELETE)
app.delete("/api/v1/echo/:id", async (req, res) => {
    try {
        const userId = req.params.id;
        const deletedUser = await User.findByIdAndDelete(userId);

        if (!deletedUser) {
            return res.status(404).json({ success: false, message: "User not found" });
        }

        res.status(200).json({
            success: true,
            message: "User Deleted Successfully",
            deletedUser: deletedUser // Sends a confirmation block back of what was dropped
        });
    } catch (err) {
        res.status(500).json({ success: false, message: "Failed to delete user", error: err.message });
    }
});

// 7. EXTERNAL SYSTEM INVOCATION LAYER
mongoose.connect('YOUR_NON_SRV_MONGODB_CONNECTION_STRING_HERE')
    .then(() => console.log("Database Connected Successfully"))
    .catch((err) => console.log("Database Connection error: ", err));

app.listen(5000, () => {
    console.log("Server is running on port 5000");
});
📘 Module 6 Master Guide: Handing Files & Multi-Part Data (Multer & cloudinary)
Text payloads (express.json()) are tiny and clean, but files (images, videos, PDFs) are binary data streams. They require special handling. We implement a professional dual-stage pipeline: Local Staging via Multer \(\rightarrow\) Cloud Synchronization via Cloudinary.
Step 1: Terminal Dependencies Installation
Before writing code, we need to install the required npm packages. Stop your server (Ctrl + C) and run:
npm install multer cloudinary dotenv
Step 2: Create the Local Directory Structure
Multer requires a temporary landing pad on your server disk to cache files before shipping them up to the cloud. In your root project directory, create the following folders:
Create a folder named
publicInside
public, create a sub-folder namedtempCreate a folder named
middlewaresCreate a folder named
utils
Your visual folder hierarchy must look like this:
├── controllers/
├── middlewares/
│   └── multer.middleware.js
├── models/
├── public/
│   └── temp/           <-- Local files sit here momentarily
├── routes/
│   └── user.routes.js
├── utils/
│   └── cloudinary.js
├── .env                <-- Hidden keys vault
└── staging.js          <-- Server entry point
Step 3: Create the Local Staging Middleware
Inside your middlewares folder, create a file named multer.middleware.js. This handles reading incoming file streams and generating clean, unique filenames so files don't overwrite each other.
// middlewares/multer.middleware.js
import multer from "multer";
import path from "path";

// Define where to store the file and how to name it
const storage = multer.diskStorage({
    destination: function (req, file, cb) {
        // Points directly to our temporary local folder
        cb(null, "./public/temp");
    },
    filename: function (req, file, cb) {
        // Generates a unique suffix using time to prevent filename collisions
        const uniqueSuffix = Date.now() + '-' + Math.round(Math.random() * 1E9);
        // Keeps the original extension name (.jpg, .png, etc) intact
        cb(null, file.fieldname + '-' + uniqueSuffix + path.extname(file.originalname));
    }
});

// Export the middleware configuration engine
export const upload = multer({ storage: storage });
Step 4: Setup Your Cloudinary Dashboard & Credentials
Go to Cloudinary.com and register for a free account.
Navigate to your Console Dashboard screen.
Locate the Product Environment Credentials section and copy these 3 items:
Cloud Name
API Key
API Secret
Step 5: Configure Your Environment Vault (.env)
Create a file named exactly .env in your project root directory. Paste your copied credentials into it.
⚠️ CRITICAL RULES FOR
.envSyntax:
No spaces before or after the
=signs.Do NOT wrap values in quotation marks (
""or'').
CLOUDINARY_CLOUD_NAME=your_actual_cloud_name_here
CLOUDINARY_API_KEY=your_actual_api_key_here
CLOUDINARY_API_SECRET=your_actual_api_secret_here
Step 6: Create the Cloud Upload Utility Engine
Inside your utils folder, create a file named cloudinary.js. This utility reads the file path written by Multer, uploads it to Cloudinary, and forcefully clears your local server space using Node's File System (fs.unlinkSync).
// utils/cloudinary.js
import { v2 as cloudinary } from "cloudinary";
import fs from "fs";
import dotenv from "dotenv";

// Call dotenv config here to avoid hoisting/order bugs in ES Modules
dotenv.config();

// Configure Cloudinary link with your account credentials
cloudinary.config({
  cloud_name: process.env.CLOUDINARY_CLOUD_NAME,
  api_key: process.env.CLOUDINARY_API_KEY,
  api_secret: process.env.CLOUDINARY_API_SECRET
});

// The execution core function
export const uploadOnCloudinary = async (localFilePath) => {
    try {
        if (!localFilePath) return null;

        // Upload the file to Cloudinary
        const response = await cloudinary.uploader.upload(localFilePath, {
            resource_type: "auto" // Auto-detects images, videos, or raw files
        });

        // File uploaded successfully! Now wipe it off our local disk
        fs.unlinkSync(localFilePath);

        return response; // Contains the permanent secure cloud URL
    } catch (error) {
        // If the upload fails, clear the local file anyway so it doesn't clog memory
        if (fs.existsSync(localFilePath)) {
            fs.unlinkSync(localFilePath);
        }
        console.error("Cloudinary upload failed:", error.message);
        return null;
    }
}
Step 7: Create the Upload Handler Logic (Controller)
Open your controllers/user.controller.js file. Add the logic to read req.file populated by Multer, kick off the cloud upload utility, and return the final link back to the client.
// controllers/user.controller.js
import { uploadOnCloudinary } from "../utils/cloudinary.js";

export const uploadProfileImage = async (req, res) => {
    try {
        // Multer automatically attaches file details to 'req.file'
        if (!req.file) {
            return res.status(400).json({ success: false, message: "No image file provided" });
        }

        // Grab the local file path from our public/temp folder
        const localFilePath = req.file.path;

        // Upload it to Cloudinary
        const cloudinaryResponse = await uploadOnCloudinary(localFilePath);

        if (!cloudinaryResponse) {
            return res.status(500).json({ success: false, message: "Failed to upload image to cloud storage" });
        }

        // Return the clean, live cloud image link!
        res.status(200).json({
            success: true,
            message: "File uploaded successfully to the cloud!",
            cloud_url: cloudinaryResponse.secure_url,
            file_details: cloudinaryResponse
        });

    } catch (err) {
        res.status(500).json({
            success: false,
            message: "Internal server error during upload",
            error: err.message
        });
    }
};
Step 8: Build the Middleware Chain (Routes)
Open your routes/user.routes.js file. Inject the Multer middleware directly into the route configuration so it processes the incoming binary file before executing the controller.
// routes/user.routes.js
import express from 'express';
import { uploadProfileImage } from '../controllers/user.controller.js';
import { upload } from '../middlewares/multer.middleware.js';

const router = express.Router();

// 'upload.single('avatar')' targets a single incoming file stream from a key named 'avatar'
router.post('/upload', upload.single('avatar'), uploadProfileImage);

export default router;
Step 9: Testing Your Architecture in Postman
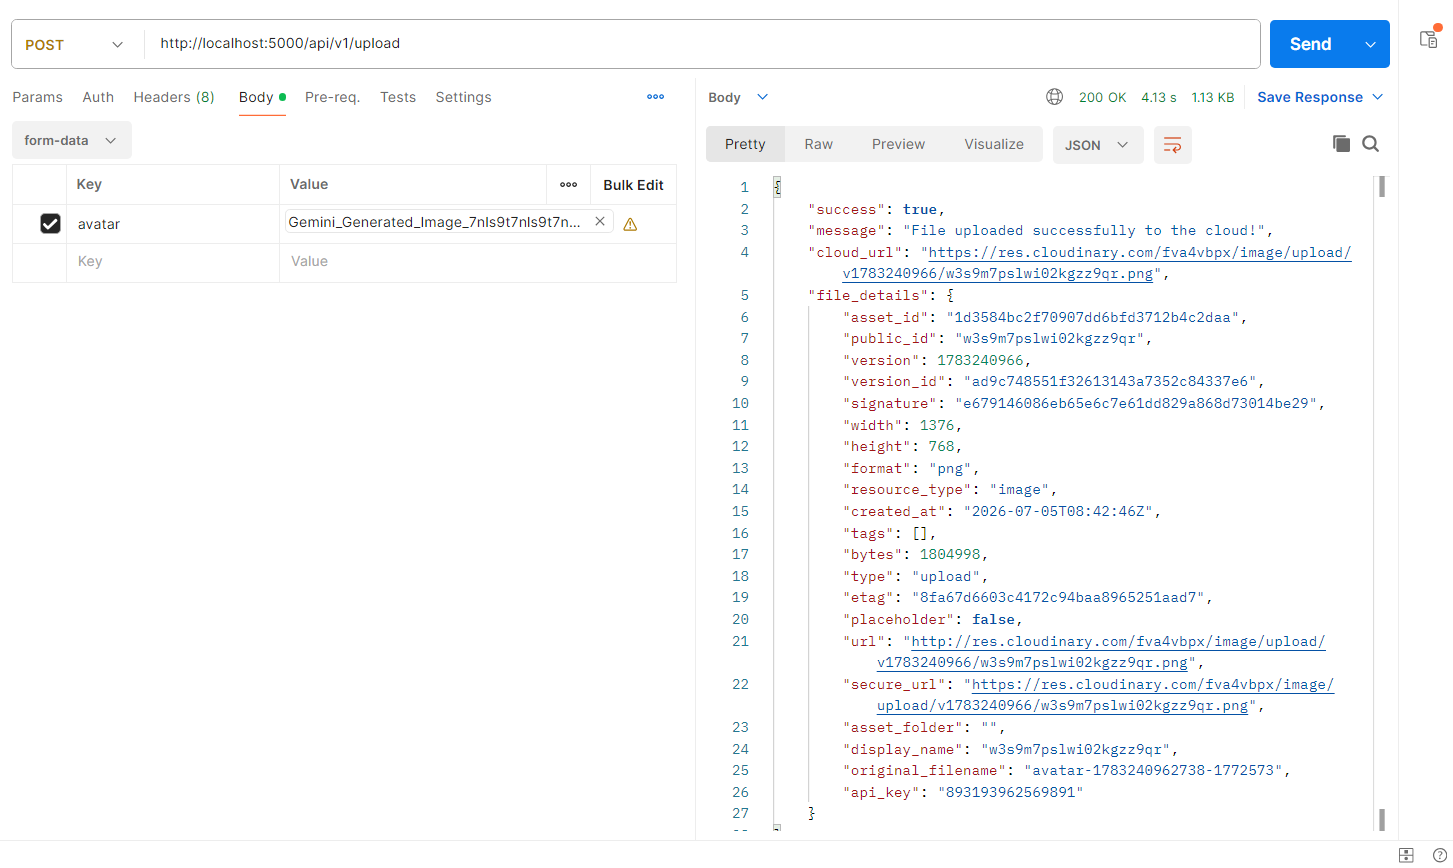
Because files are heavy binary blobs, they cannot be typed or parsed into a traditional raw JSON field box. You must use multi-part formatting rules:
Start your server instance (
nodemon staging.js).Open Postman, configure the request dropdown method to
POST.Set the request destination target address exactly to:
http://localhost:5000/api/v1/upload
Move down to the configuration tabs under the URL bar and select the
Bodytab.Choose the
form-dataradio selection option.In the KEY text slot, type exactly:
avatar(This must match the string insideupload.single('avatar')perfectly!).Hover over the right-hand edge of that Key input field box until a hidden dropdown selection appears. Click it and change the selection type from
TexttoFile.Look in the VALUE column slot. A new interactive "Select Files" button will show up. Click it and upload any image asset (
.png,.jpg) from your desktop machine.Click Send!
Module 7 : Password Encryption & Pre-Hooks
Storing passwords as plain text leaves user data highly vulnerable. We implement a security perimeter using one-way cryptographic hashing before data ever touches persistent storage.
- Key Concepts:
One-Way Hashing vs. Encryption: Encryption is a two-way process (can be decrypted with a key). Hashing is mathematically irreversible. Validation is achieved by comparing a new hash of the typed login input with the stored hash in the database.
Bcrypt Salt Rounds: Salting adds a string of unique random data to the password input before hashing to eliminate vulnerabilities to pre-computed hash lookup tables (Rainbow Tables).
Mongoose Pre-Save Hooks: Lifecycle triggers that intercept document operations. When executing asynchronous pre-save hooks (
async function), modern Mongoose treats the resolution of the returned Promise as an automatic progression step, completely bypassing the manual execution of anext()callback function parameter.The
thisContext Constraint: We intentionally use standard function syntax (async function()) instead of ES6 Arrow Functions because arrow functions lexically bindthis, breaking our ability to target document parameters (this.isModifiedorthis.password).
- The Production Pre-Save Hashing Hook:
userSchema.pre("save", async function () {
    // Only scramble the password field if it's new or modified
    if (!this.isModified("password")) return;

    try {
        const salt = await bcrypt.genSalt(10);
        this.password = await bcrypt.hash(this.password, salt);
    } catch (err) {
        throw new Error(err.message);
    }
});